Speeding up your Node.js development with Cody
Leveraging AI to accelerate your workflow as a software engineer is no longer considered a lazy approach; instead, it allows you to focus on more critical aspects of your work. In this article, we'll delve into how you can speed up the setup and development of your Node.js (Express.js) APIs using Sourcegraph Cody. Before we begin, let's briefly discuss what Node.js is.
What is Node.js and Express.js?
Node.js is a JavaScript runtime environment that runs on the Chrome v8 JavaScript engine. In this article, we'll build our API using the Express.js framework and TypeScript. Express.js is one of the most popular Node.js web application frameworks that provides a robust set of features for web applications and APIs.
Setting up Express with the help of Cody
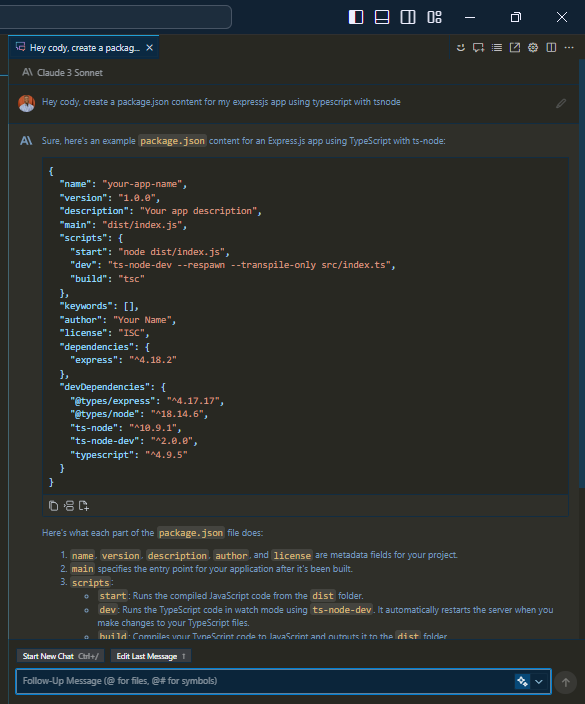
First, I’ll create an app.ts file in the src folder (you can decide to use any folder structure you like) and I’ll use Cody to generate my package.json file with the prompt:
Hey Cody, create a package.json content for my Express.js app using typescript with ts-node
Cody generates the package.json content for me, which I can further edit if needed. Asking Cody to generate the package.json file is much easier compared to installing all required packages manually. Here is the package.json content Cody generated:
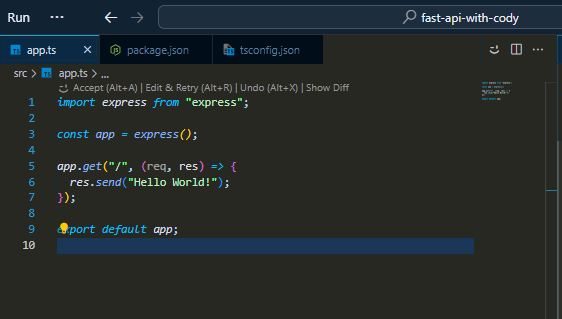
To continue with the server setup, I’ll also ask Cody to generate a simple Express server using this prompt:
Hey Cody, can you generate a basic express server,that is exportable without .listen() for me?
and we have our basic app. In this article, I will build a multimedia app that merges videos together, converts video to audio, generates a thumbnail for a video, and splits a video into smaller chunks based on specified duration. I’ll be making use of ffmpeg via the node fluent-ffmpeg package.
PS: To make use of the fluent-ffmpeg package, you will need to have ffmpeg and ffprobe install on your host computer, check the documentation on installing ffmpeg.
Advanced set up
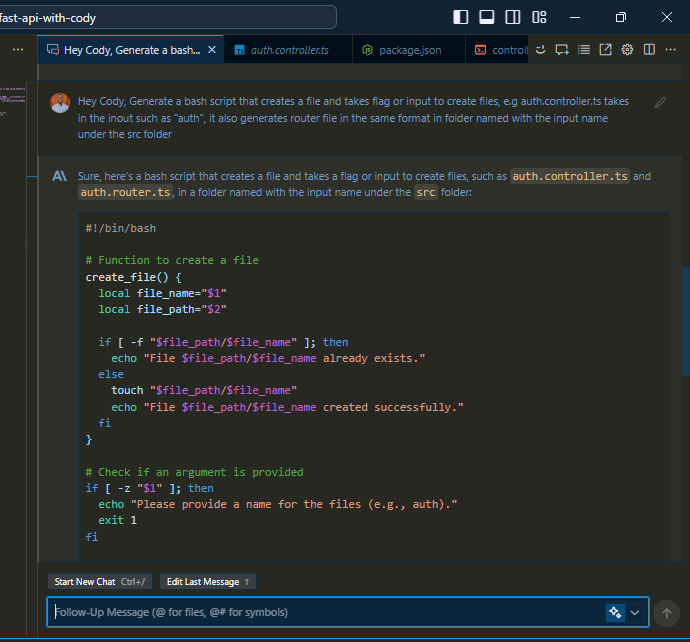
Another setup task that will really make you a productive developer is to write Bash scripts for repetitive tasks such as: creating controllers, routers, etc. In this case, I’ll use Cody to create a Bash script to automate repetitive tasks.
Hey Cody, Generate a bash script that creates a file and takes a flag or input to create files, e.g auth.controller.ts takes in the input such as "auth", it also generates router file in the same format in the folder named with the input name under the src folder
Cody generates my bash script for me and then I add the makecontroller command to the scripts in the package.json file. This bash script generated allows me to create template controllers and routes instead of having to do them repetitively.
"makecontroller":"bash ./scripts/controllerMaker.sh"
 // make use of the path to your bash script
And you can make use of
npm run makecontrollerHere’s the Bash script Cody generated for me:
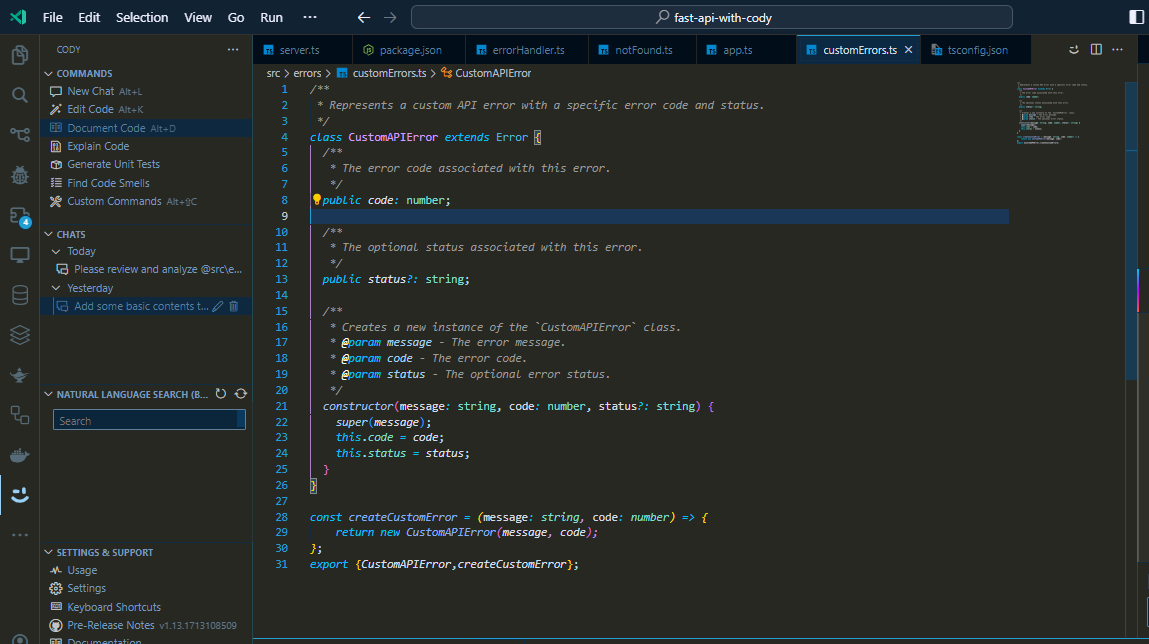
When building APIs, error handling is one of the most crucial things to take into consideration. In Express.js, error handling can be handled using a global error handler for fatal errors in the app. Before creating the global error handler, I need to create a custom error class that makes the JavaScript Error object more useful in our Express.js app. I prompted Cody:
Hey Cody, can you generate a CustomAPIError class which extends the Error class, the constructor takes in code, message and optional status and the message can be inherited from the parent class?
Cody generated the CustomAPIError class and I added more functionality to the code:
class CustomAPIError extends Error {
  public message: string;
  public code: number;
  public status?: string;
  constructor(message: string, code: number, status?: string) {
    super(message);
    this.code = code;
    this.status = status;
  }
}
const createCustomError = (message: string, code: number) => {
    return new CustomAPIError(message, code);
};
export {CustomAPIError,createCustomError};
With this, I can always call the createCustomError function to create errors within my app. From here I can create a global error handler:
import { Request, Response, NextFunction } from "express";
import { CustomAPIError } from "../../errors/customErrors";
export const globalErrorHandler = async (
    err: any,
    _: Request,
    res: Response,
    __: NextFunction
) => {
    return res
        .status(500)
        .json(
            {
                message: err instanceof CustomAPIError ? err.message : "Something went wrong,please try again later.",
                statusCode: err instanceof CustomAPIError ? err.code : 500,
                data: null,
            }
        );

};
The next thing I’ll do is create a handler for 404 (Not Found) error, prompting Cody:
Can you create a handler that handles 404 error in my Express.js server?
and my 404 handler as shown below:
import { RequestHandler } from "express";

export const notFound: RequestHandler = (req, res) => {
  return res.status(404).json({
    statusCode: 404,
    message: "This path exists somewhere in space time but not here",
    data: null,
  });
};
Building the multimedia app endpoints
There are four functionalities our multimedia app does, and I will create the four endpoints by running my npm run makecontroller script.
import express from 'express';
import { ffmpegController } from './fluent-ffmpeg.controller';

const router = express.Router();

router.post("/merge-videos",ffmpegController.mergeVideos);
router.post("/convert-video-to-audio",ffmpegController.convertVideoToAudio);
router.post("/generate-thumbnails",ffmpegController.generateThumbnails);
router.post("/split-video",ffmpegController.splitVideo);
export default router;
Then I move forward to create my controllers; editing the controller template that was already created.
import { Request, Response } from 'express';
import ffmpeg from 'fluent-ffmpeg'
import { uploadAudioToCloudinary, uploadToCloudinary, uploadVideoToCloudinary } from '../utils/helpers';
import path from 'path';
const parentDirectory = path.resolve(__dirname, '../../');

export const ffmpegController = {
  mergeVideos: (req: Request, res: Response) => {
    const video1Path = req['files']['video_one'].path;
    const video2Path = req['files']['video_two'].path;

    const outputPath = parentDirectory + "/output/mergedVideo.mp4"

    ffmpeg()
      .input(video1Path)
      .input(video2Path)
      .on('end', async () => {
        try {
          const url = await uploadVideoToCloudinary(outputPath, 'mergedVideo')
          res.status(200).json({ message: 'Videos merged successfully', data: { url } })
        } catch (error) {
          console.log(error)
          res.status(500).json({ message: error.message });
        }

      })
      .on('error', (err) => {
        res.status(500).json({ message: err.message });
      })
      .mergeToFile(outputPath, 'tempDir');
  },
  convertVideoToAudio: (req: Request, res: Response) => {
    const videoPath = req['files']['video'].path;
    const audioOutputPath = parentDirectory + "/output/audio.mp3"

    ffmpeg(videoPath)
      .output(audioOutputPath)
      .on('end', async () => {
        try {
          const url = await uploadAudioToCloudinary(audioOutputPath, 'convertedAudio')
          res.status(200).json({ message: 'Video converted to audio successfully', data: { url } })
        } catch (error) {
          console.log(error)
          res.status(500).json({ message: error.message });
        }
      })
      .on('error', (err) => {
        console.error(err);
        res.status(500).send('An error occurred while converting video to audio');
      })
      .run();
  },
  generateThumbnails: (req: Request, res: Response) => {
    const videoPath = req['files']['video'].path;
    const thumbnailOutputPath = parentDirectory + '/output/thumbnail.png';

    ffmpeg(videoPath)
      .screenshots({
        timestamps: ['50%'],
        filename: 'thumbnail.png',
        folder: 'output',
        size: '320x240'
      })
      .on('end', async () => {
        try {
          const url = await uploadToCloudinary(thumbnailOutputPath, 'thumbnail')
          res.status(200).json({ message: 'Thumbnail generated successfully', url });
        } catch (error) {
          console.log(error)
          res.status(500).json({ message: error.message });

        }

      })
      .on('error', (err) => {
        console.log(err);
        res.status(500).json({ message: 'An error occurred while merging videos', error: err.message });
      });
  },
  splitVideo: (req: Request, res: Response) => {
    const { chunkDuration } = req.body;
    const videoPath = req['files']['video'].path;
    const splittedVideosUrl: string[] = [];

    ffmpeg.ffprobe(videoPath, async (err, metadata) => {
      if (err) {
        res.status(500).json({ message: err.message });
        return;
      }

      const duration = metadata.format.duration;
      const numChunks = Math.ceil(duration / chunkDuration);
      const placeholderArray = new Array(numChunks).fill(0);
      const promises = placeholderArray.map(async (_, i) => {
        const startTime = i * chunkDuration;
        const endTime = Math.min((i + 1) * chunkDuration, duration);

        return new Promise((resolve, reject) => {
          ffmpeg(videoPath)
            .outputOptions([
              '-ss', startTime.toFixed(2),
              '-t', (endTime - startTime).toFixed(2),
              '-c', 'copy'
            ])
            .output(`output/chunk_${i}.mp4`)
            .on('end', () => {
              splittedVideosUrl.push(`output/chunk_${i}.mp4`);
              resolve(splittedVideosUrl);
            })
            .on('error', (err) => {
              console.error(`Error creating chunk ${i}:`, err);
              reject(err);
            })
            .run();
        });
      });

      try {
        await Promise.all(promises);
        res.status(200).json({ message: 'Video split successfully', data: { url: splittedVideosUrl } });
      } catch (err) {
        console.error('Error splitting video:', err);
        res.status(500).json({ message: 'Error splitting video' });
      }


    });
  }
};
In the controller for merging videos, you’ll notice that the client app can only merge two videos which can be limiting. A user should be able to merge more than two videos together. I had an idea on how to approach the problem but the implementation was not flowing. With Cody, I highlighted the section I needed help with and initiated a chat using Cmd/Alt + L and Cody came to my rescue.

Documenting your code with Cody
Documentation is an important aspect of software engineering, although it is always advisable to write self-documenting code, but there are times we still need to document code. In my Express.js app, I created a custom error class, which may or may not be strange to someone new to the codebase. Thanks to Cody once again; I can generate docs for my code, using Cmd/Alt + D, and here are the docs generated by Cody:
Writing unit tests with Cody
Unit testing is another important part of software engineering, that can take time and sometimes can be boring. Again, Cody can help generate unit tests, here's how:
On the left side of VS Code in the Cody tab, you’ll see a "Generate Unit Test" command. Clicking it will task Cody with generating a Unit test for my merge video controller as shown:

With the initial test cases created,I can still edit and add additional test cases according to my needs. Cody makes it easier for me to kickstart my unit testing. The end-to-end testing of the app can be done using any API Client of your choice and the complete code of this app can be found on Github
Other use cases Cody in speeding up your Node.js development
Cody's capabilities go beyond generating code. It's a very powerful tool that can be used to improve your codebase, for example, by using the "Find Code Smell" feature. Here's a review I got from Cody for my custom error class.

Finally , I’ll be creating a custom command with Cody. This helps me to tailor Cody based on my project requirement, especially for recurring tasks like Integrating with your build system to suggest fixes for errors/warnings in the latest build, generating commit messages, etc.
For this sample app I will be creating custom commands to create template controller function in the fluent-ffmpeg.controller.ts, which enables me to easily add new controllers based on the style and format of previous controllers created in the file. To create this custom command I make use of Cmd/Alt + Shift + C and I made use of the prompt:
Create a template controller function that can be used to add more feature to the app as part of creating a new controller function. My
cody.jsonlooks like:
{
    "commit-message": {
        "description": "Commit message for current changes",
        "prompt": "Suggest an informative commit message by summarizing code changes from the shared command output. The commit message should follow the conventional commit format and provide meaningful context for future readers.",
        "context": {
            "selection": false,
            "command": "git diff --cached"
        }
    },
    "extra-ffmpeg-feature": {
        "prompt": "Create a template controller function that can be used to add more feature to the app as part of creating a new controller function",
        "context": {
            "selection": false,
            "currentFile": true
        },
        "mode": "insert"
    },
    "readme": {
        "description": "Readme for current dir",
        "prompt": "Write a detailed README.md file to document the code located in the same directory as my current selection. Summarize what the code in this directory is meant to accomplish. Explain the key files, functions, classes, and features. Use Markdown formatting for headings, code blocks, lists, etc. to make the it organized and readable. Aim for a beginner-friendly explanation that gives a developer unfamiliar with the code a good starting point to understand it. Make sure to include: - Overview of directory purpose - Functionality explanations - Relevant diagrams or visuals if helpful. Write the README content clearly and concisely using complete sentences and paragraphs based on the shared context. Use proper spelling, grammar, and punctuation throughout. Surround your full README text with triple backticks so it renders properly as a code block. Do not make assumptions or fabricating additional details.",
        "context": {
            "currentDir": true,
            "selection": true
        }
    }
}
I have also added commands to generate commit messages and readme file content. This is a super powerful way of making Cody work for you. When I run the extra-ffmpeg-feature command, it creates a template controller that follows the style of previous controllers. I can then fine-tune it to my requirements, and it makes my work super easy.

Beyond all the examples that have been mentioned in this article, Cody can be seen as your productivity buddy; making your setup and development process faster and allowing you to spend more time on business logic while building your apps. So, go ahead and give cody a try, and watch as your developer experience and productivity soar.